1. FBlock in the example

The shown function block outputs signals, which are determined by the right shown textual file. The advantage: The stimuli text file can be generated by a tool for test stimuli.
In comparison with a graphical editing stimuli FBlock it should be contrast:
-
Editing of points with the mouse in graphical (timing) view
-
Writing numbers of times and levels in a line.
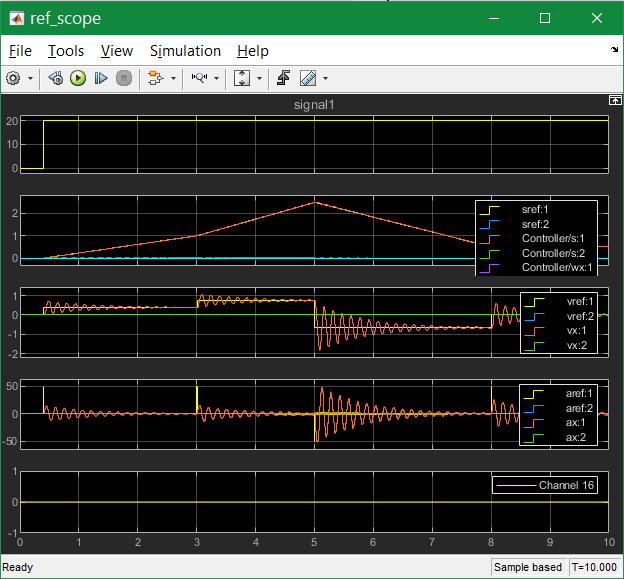
The second one may be simple too, the result can be viewed in a simple model with only the TimeSignals FBlock and a scope. The advantage is that the text file can be simple visit and generated by another tool for test cases. Another advantage may be: The text file remains open, the cursor focused in point of interest, and a correcture of a value can be done fastly between simulation runs.
An immediate manual access to simulation values on demand is also possible, via the 'Inspector tool':
2. Meaning of the spline for controlling stimuli
A reference value for controlling applications can be a jump stimuli, it shows the own oscillation frequency of the system. A ramp forces also oscillation, because the deviation of a ramp is a jump.
An oscillation-able system does not oscillate, if it is not stimulated with high-harmonics input signals. A spline function is better if the static behavior should be evaluated, or another state should be reached to test some oscillations.
Hence the spline may be important for some input stimuli values.
3. Syntax of the variable definition arguments (varDef)
It is the same syntax as in the DataStruct_Inspc but not all possibilities are meaningful here.
line::=
{ = <?initVar>
| <$?name>
| -<#?accessRights>
| : [F|D|U|I|W|S|V|B|Z|f|d|j|i|<$typename>] [{ * <#?arraysize> }]
}.
-
Only name given: A float variable.
-
Letter F D U I W S V B Z for single, double, U=uint32, I=int32, W=uint16, S=int16, V=uint8, B=int8, Z=boolean
-
Letter f d i for adequate complex values (float, double, int32)
-
Typename: it is a handle with this C/++-type (test via reflection)
-
arraysize on-dimension as number after type name, max 6
-
= before name as dedication for a init-Variable, value gotten only one time till runMode.
-
accessrights for Access via Inspector.
Examples:
a,b;            //two variables, float
a:F; bcplx:f;   //a is float, bcplx is float-complex
i2 : i*2;       //integer array, 2 elements
4. Syntax in the stimuli file
One of the paramter of a TimeSignalValue_Inspc FBlock is the 'Stimuli file pathstimuli file path''. It is essential, the stimuli file contains the timing.
The stimuli file can be any file, especially a matlab script file (*.m) which can contain additionally some matlab statements especially for stimuli matlab variable. A line starting with
%time:
is a line for a Stimuli for the TimeSignalValue_Inspc. It is a comment in a matlab script file.
%time:<#f?time> [ - <#f?spline> ] : { <varSetting> ? , }.
varSetting::= <$nameModul>.<$nameSignal> [ = | => <?ramp>] { <#f?value> }.
-
timein seconds -
splinethe value is the start and end of spline arround the time. -
varSettings: More as one Setting for this time are possible. -
Hint: The times can be unsorted in the stimuli file. More as one line with the same time can exists. The association of more as one setting to one time is only possible for better presentation.
-
nameModul: This should much to the given 'Name in reflection-tree' of this FBlock. It an entry does not find its FBlock, it is not an error - because anyTimeSignalValue_InspcFBlock checks the entries by itself, it cannot know wheter another FBlock for the given name is existent. -
nameSignalshould match to one of the variable defined for this FBlock, see chapter above. A faulty name is reported as error. -
=or= >: The first one designates a jump to the value, the= >designates a ramp, maybe with or without givensplinevalue. -
value: There are up to 6 values possible, filled for more as one element of a vector or for complex values. The memory space for values is limited to 6 4.byte values which can be outputted as vector or complex (complex vector with three elements), as float or as integer too.
This file can be written or changed manually, or it can be generated. The next video shows the manual handling:
5. The Stimuli Selection tool
The benefit of the textual given stimuli is: Any tool with textual output can produce such a file. Especially a Stimuli Selector produces this file.
5.1. Using and selecting some test cases
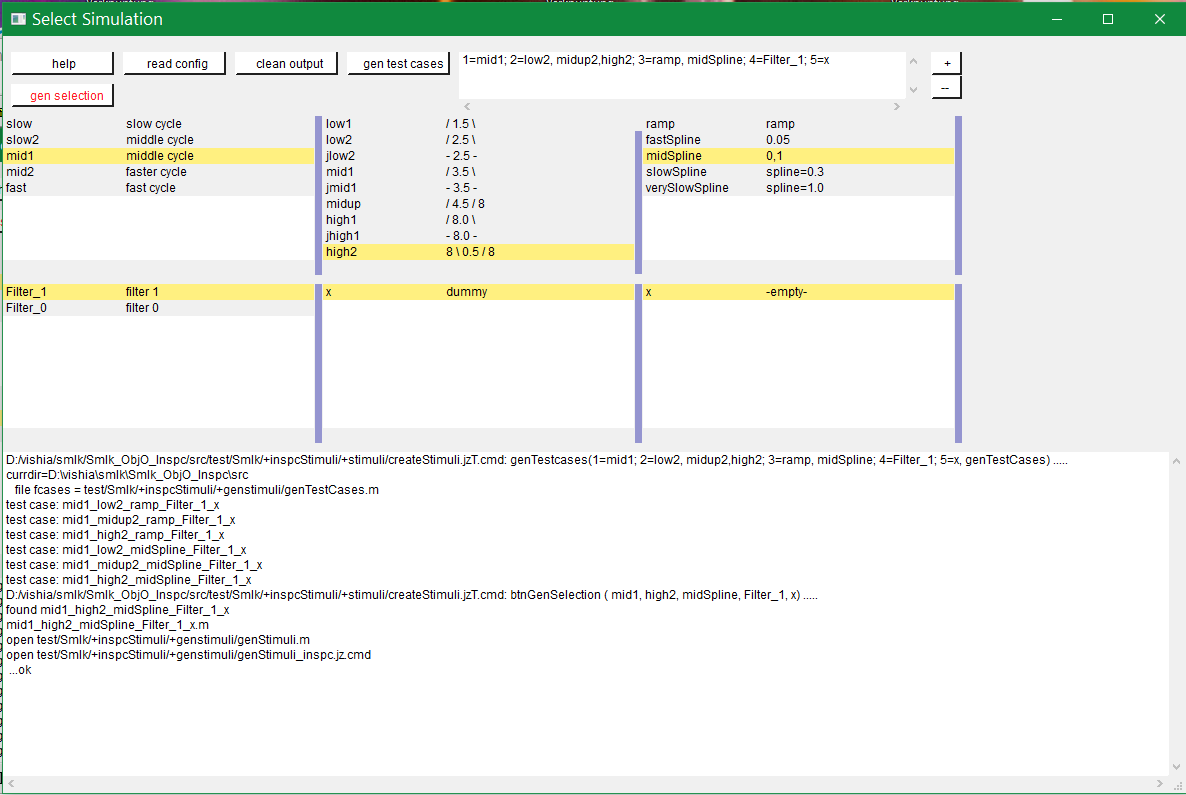
This GUI is started calling src/test/Smlk/+inspcStimuli/+stimuli/Stimuli_SelectionTool.jzT.cmd calling in its current folder (double click in Explorer or such). There is also a Matlab script file to start: …/+inspcStimuli/+stimuli/Stimuli_SelectionTool.m.
You can select some lines in the given tables. The description should be enough as description. For this example the second column contains a pseudo graphic description, / 1.5 \ is a ramp to the value 1.5 and back again, - 2.5 - is a jump stimuli. Elsewhere it is a textual verbal description. The name of the line should be also concisely but as short mnemonic.
After selecting press [gen selection]. Then some report texts are shown and the …/+inspcStimuli/+genstimuli/genStimuli.m is created newly.
The simulation can be started in Simulink, or maybe with the main scope as knwon in Simulink. It executes the new created …/+inspcStimuli/+genstimuli/genStimuli.m
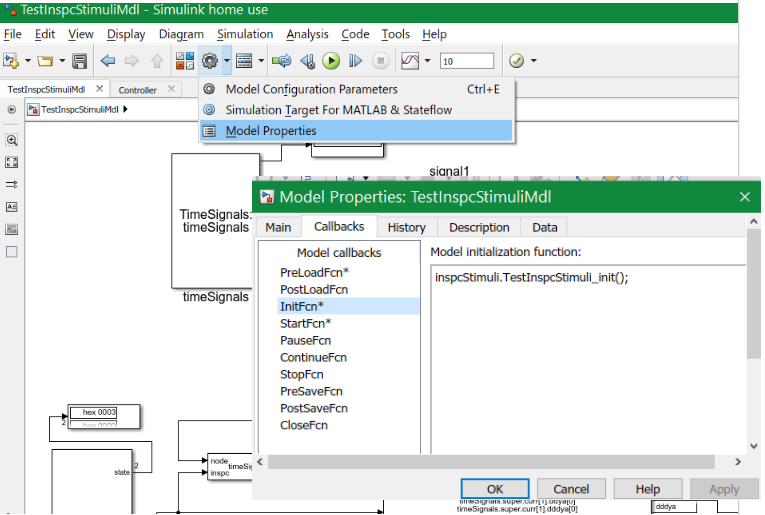
both as configuration for the TimeSignals FBlock and for initialization of the model, because it is called in the initialization routine:
Content of …/+inspcStimuli/TestInspcStimuli_init.m:
currdir = fullfile(rootPath,'test/Smlk/+inspcStimuli')
Tstep = 0.0001;
Tinit = 0.1;
inspcStimuli.genstimuli.genStimuli();
The approach is: Test some cases with manually selection of stimuli to get familiar both with the model and with the stimulies. You can tune your functionality in the model, and also tune the stimulies, see next chapter. Later you should plan and execute in nightly tests some selected test cases, see chapter #executeTest
6. Configuration of the stimuli selection tool
6.1. What should I do? Changing values:
The next video shows how the stimuli tool can be configured:
Video ge: configuration of the stimuli tool 18 min (The video was done with an older version, 2018-11)
The example file src/test/Smlk/+inspcStimuli/+stimuli/Stimuli_SelectionTool.jzT.cmd contains the configuration for the SimSelector (shown image). For exampe the left upper table is determined by the following text:
List variation_1 @name =  ##times
[ { name="slow",  t1="3.0", t2="5.0", t3="8.0", descr="slow cycle"    }
, { name="slow2", t1="2.0", t2="5.0", t3="6.0", descr="middle cycle"    }
, { name="mid1",  t1="2.0", t2="4.0", t3="6.0", descr="middle cycle"    }
, { name="mid2",  t1="2.0", t2="3.0", t3="4.0", descr="faster cycle"    }
, { name="fast",  t1="1.0", t2="1.7", t3="2.5", descr="fast cycle"    }
];
It is a list container in the JZtxtcmd script language and presents internally a list of some variables Maps. The variable name and descr are always necessary, need by the SimSelector. The value of the name is used as key for the List, which is also a Map<String,…> . The other variables are used for free, depending on the generation parts of the script. For a given generation you can change the values. You can change the generation in details to get more variable with their values.
The graphical tool reads the content, presents it and uses the variables to generate the output script for simulation, for this example src/test/Smlk/+inspcStimuli/+genstimuli/genStimuli.m .
The essential file for the generation of stimuli for this example is the src/test/Smlk/+inspcStimuli/+stimuli/Stimuli_template.m.jztc:
 ==JZtxtcmd==
 ##This subtext is the template for a ready to use stimuli file.
 ##'data' is of type Map<String, String> and comes from the 'List vars'
 ##in the Stimuli_SelectionTool.jzT.cmd
 ##
sub stimuliMat(Obj data) {
 <:>
 %Stimuli file matlab.m and times. Hint: the lines with time: should not be sorted.
 %
 %===Common Settings===
 identSimulation = '<&data.Identifier>';
 timeSignalFilepath = fullfile(currdir,'<&fileStimuli_m>')   %the path from simulink currdir.
 %
 %===Initial values===
 %time:0: timeSignals.sref = 0.0, timeSignals.signal1 = 0;
.
 %==static test vector complex==
 %time:1.0: timeSignals.vector= 1.0 1.1 1.2 1.3 1.4 1.5, timeSignals.complex = 1.2 -0.8;
.
 %===Test===
 %time:0.4 <&data.spline>: timeSignals.sref => 0.0, timeSignals.signal1 = 20;
 %time:<&data.t1><&data.spline>: timeSignals.sref <&data.val1>;
This file is the template for the time stimuli and math file. Both, timing stimuli values and initial matlab values comes from a data instance, which is filled with the variables of the lists of the selection tool. You can change some information in this script with given variables, or change the variables too, see next chapter.
The scripts will be re-read if the button [read config] is pressed in the SimSelector tool. Possible syntax errors are shown with file. line and expected. Be aware of correct writing according the given schema.
6.2. What should I do? Adding more variables:
In the src/test/Smlk/+inspcStimuli/+stimuli/Stimuli_SelectionTool.jzT.cmd there is also a
List vars =
[Subtextvar name = <:><&line1.name>_<&line2.name>_<&line3.name>_<&line4.name>_<&line5.name>_<.>;
 Subtextvar Description = <:><&line1.descr> <&line2.descr> <&line3.descr> <&line4.descr> <&line5.descr><.>;
 Subtextvar Identifier =  <:><&line1.name>_<&line2.name>_<&line3.name>_<&line4.name>_<&line5.name><.>;
 String     activate = "1";
 Subtextvar t1 = <:><&line1.t1><.>;
 Subtextvar t2 = <:><&line1.t2><.>;
 Subtextvar t3 = <:><&line1.t3><.>;
 Subtextvar val1 = <:><&line2.val1><.>;
 Subtextvar val2 = <:><&line2.val2><.>;
 Subtextvar val3 = <:><&line2.val3><.>;
 Subtextvar spline = <:><&line3.spline><.>;
 Subtextvar nref = <:><&line1.nref><.>;
 Subtextvar Mref = <:><&line2.Mref><.>;
];
This is the list containing the pattern for the variables which are present in the data instance. The value of a Subtextvar is built on access. It means the select line… in the GUI or for a selected test case determines which values are filled into. This list relates the variables as elements of the lines to the variables to offer in data for generation. The names of the elements of lines and the name of the element in data are the same. It is not necessary but recommended. So the names in the time template script (on %time:…) are adequate the shown names in the lists.
You can add some more variables according to the schema, relating other variables and change the building rule of theire values. The text between <:>….<.> is a String. <&name.element> is the access to given variables. Given variables are either global ones in the script or the elemens in line1 … line6.
6.3. How does it works? Generate manual selected stimuli with this tool
6.3.1. Files
For this system three files associated to the Simulink-model(s) to test are used:
-
…/+ModelDir/+stimuli/createStimuli.jzT.cmd: This script contains the core generating routines. It is the start script to generate outside the SimSelector tool. -
…/+ModelDir/+stimuli/Stimuli_SelectionTool.jzT.cmd: This script contains the tables for stimuli cases. It is the start script for the SimSelector tool. -
…/+ModelDir/Stimuli_template.m.jztc: This file contains the template for the ready to use stimulation mat script.
Hint: Usage of a +ModelDir/ is recommended independent of the stimuli topic. It enables the classification or coordination of Simulink files, able to use with the dot operator: ModelDir.modelfile for example on calling of Matlab files. Only the directory before this +ModelDir should be part of the Matlab PATH.
6.3.2. Invocation of SimSelector Tool
The start of the SimSelector GUI is done with the first lines in mdlStimuli_SelectionTool.jzT.cmd:
SET LOGDIR=stimuli_Selection_Log_deleteMe
if not exist %LOGDIR% mkdir %LOGDIR%
set SWTJAR=org.eclipse.swt.win32.win32.x86_64.jar
set JAVA_CP=../../../../../libs/vishiaGui.jar;../../../../../libs/vishiaBase.jar;../../../../../libs/%SWTJAR%
javaw -cp %JAVA_CP% org.vishia.simSelector.SimSelector createStimuli.jzT.cmd 1>%LOGDIR%\log.txt 2>%LOGDIR%\err.txt
if %ERRORLEVEL% == 0 goto :noerror
  type %LOGDIR%\err.txt
  pause
:noerror
exit /b
That are the essential lines (without comments). Some explanations:
-
The script should be started with double click or with a Matlab
…/+ModelDir/+stimuli/Stimuli_SelectionTool.mscript from its own directory as current one. -
Hence the jar files are found in the
…/libson the root of the Simlink working tree (SandBox). This jar files are necessary. They are downloaded from internet (www.vishia.org) using thelibs/+load.batand thelibs/bomVishiaJava.txt. -
The
javawis used to invoke Java. This does not need the back cmd window to run the application. The back window can be closed manually if the GUI is running. Unfortunatellystartas batch command cannot be used, because it prevents writing to the err.txt file. -
If any error on starting javaw occurs, it is written to the
err.txt, which can be evaluated. ThenERRORLEVELis set to 1 fromjavaw, and it is displayed tillpause. An error can occurs for example if a jar file is missing or faulty or if thecreateStimuli.jzT.cmdargument file is missing or has an syntax error. -
The
out.txtanderr.txtremain opened on closed background cmd because they are associated to the Java process, but it is not written there anymore. The files are closed only on ending of the GUI. -
All running errors (in the scripts, not found variable on generation etc.) are reported to the output window of the GUI.
6.3.3. Generate the stimuli.m file on button [gen selection]
If the button [gen Selection] is pressed, then the following operation is called. This sub routine is part of …/+ModelDir/+stimuli/createStimuli.jzT.cmd:
##
##This routine will be called from inside the Java programm org.vishia.simSelector.SimSelector
##  on the button gen selection. It generates the selected test case.
##  @args: Map contains some named variables which are processed in genSelection(...)
##
sub btnGenSelection ( Map line1, Map line2, Map line3, Map line4, Map line5, Map line6) {
 <+out><&scriptdir>/<&scriptfile>: btnGenSelection ( <: >
   <&line1.name>, <&line2.name>, <&line3.name>, <&line4.name>, <&line5.name>) ..... <.+n>
 Map data;
 for(cell: vars) {
   String value = <:><&cell><.>;  ##Fills elements of Subtextvar with current data
   data.put(cell.name, value);    ##create all variables in data using the elements of vars
 }
The subroutine gets the 6 lines of all tables. In this first part the data Map is filled using the values in the line. This is explained below in this chapter. With the filled data instance the following files are generated in this subroutine in the next lines:
 <+out>found <&data.Identifier><.+n>
 ##
 ##Output the files which are used from Simulink.
 ##
 //debug;
 <+out><&data.Identifier>.m<.+n>
 <+out>open <&dirMdl>/<&fileStimuli_m><.+n>           ##this variable are defined in the including Stimuli_SelectionTool.jzT.cmd
 Openfile sf = <:><&dirMdl>/<&fileStimuli_m><.>;
 <+sf>
 <:subtext:"stimuliMat":data = &data>  ##write this subtext to thr file
 <.+close>
 //
 <+out>open <&dirMdl>/<&fileStimuli_inspc><.+n>
 Openfile sf = <:><&dirMdl>/<&fileStimuli_inspc><.>;
 <+sf>
 <:subtext:"stimuliInspc":data = &data>  ##write this subtext to thr file
 <.+close>
 <+out> ...ok<.+n>
}
This subroutine is also called to generate the stimuli file for tests in the loop, called from genStimuli(…), see chapter How does it works? The stimuli generation routine.
The essential statement is <:subtext:"stimuliMat":data = &data>. It invokes a sub text generation. The text is that one in the template in the chapter above, the template for the resulting stimuli Matlab file. Adequate is done for so namen 'Inspector stimulis' to set internal variable in some DataMng_Inspc FBlocks.
6.3.4. Fill the data instance
As shown in chapter What should I do? Adding more variables the data are determined by the List vars.
The data instance is filled with the values in the lines line1 etc. with the following construct inside the stimuli tool file …/+ModelDir/+stimuli/Stimuli_SelectionTool.jzT.cmd:
##This list will be dynamically filled if its elements are accessed
##if it contains a Subtextvar. The source variable are taken from the environment.
##This is a feature of JZtxtcmd for symbolic dynamic access.
##It means line1 .. line6 are variables in context, where an element of vars is accessed.
##The list contains the values which should be prepared for a selection.
List vars =
[Subtextvar name = <:><&line1.name>_<&line2.name>_<&line3.name>_<&line4.name>_<&line5.name>_<.>;
 Subtextvar Description = <:><&line1.descr> <&line2.descr> <&line3.descr> <&line4.descr> <&line5.descr><.>;
 Subtextvar Identifier =  <:><&line1.name>_<&line2.name>_<&line3.name>_<&line4.name>_<&line5.name><.>;
 String     activate = "1";
 Subtextvar t1 = <:><&line1.t1><.>;
 Subtextvar t2 = <:><&line1.t2><.>;
 Subtextvar t3 = <:><&line1.t3><.>;
 Subtextvar val1 = <:><&line2.val1><.>;
 Subtextvar val2 = <:><&line2.val2><.>;
 Subtextvar val3 = <:><&line2.val3><.>;
 Subtextvar spline = <:><&line3.spline><.>;
 Subtextvar nref = <:><&line1.nref><.>;
 Subtextvar Mref = <:><&line2.Mref><.>;
];
The List vars in JZtxtcmd is a java.util.List<java.util.Map<String, Variable<…>>> in Java.
All Subtextvar as a special Variable are filled on access. The access is done with <&cell> in the sub btnGenSelection above:
for( .. ..
  String value = <:><&cell><.>;  ##Fills that elements of cell as Subtextvar
  data.put(cell.name, value);
}
Because this invocation is done in the context of the for loop in the sub btnGenSelection, the line* variable are known in the context, and used. Subsequently the values from the current line are used for the data container. The data container is used in the template script above.
Using this feature of JZtxtcmd it is more simple to present only one data instance for the template generation script, instead several line* variable. The scope of design of both scripts, the abilities for simulation selection, and the presentation in the time signals script, can be separated.
7. Generating manual planned test cases
7.1. What should / can I do?
The idea is: Assembling some test cases on demand and study manually the behavior. It is possible to write a pattern to select some test cases. They can be executed automatically one after another. This is the preparation of the next chapter: Execute nightly tests with the stimuli
The Stimuli Selection tool contains a text input box right side of the button [gen test cases] and this button. It should contain a textual given pattern for some test cases, a combination. This box can be filled both with double click or selecting some lines and with additional supplementing of a structure for blocks.
7.1.1. Double click approach:
If you select some lines in the tables, the table number and the name in the line is written to the selecting text box:
1=mid1, fast; 2=low1, high2
If you click in the same table, the names are separated with , for better readability. For this example a combination of 2 x 2 test cases is given. You should select from all tables (here except table 6 which is not used).
1=mid1, fast; 2=low1, high2; 3=ramp, midSpline; 4=Filter_1; 5=x
Here some lines of all tables are clicked. It is a combination of 8 test cases, which are reported on pressing [gen test cases]:
   file fcases = test/Smlk/+inspcStimuli/+genstimuli/genTestCases.m
test case: mid1_low1_ramp_Filter_1_x
test case: fast_low1_ramp_Filter_1_x
test case: mid1_high2_ramp_Filter_1_x
test case: fast_high2_ramp_Filter_1_x
test case: mid1_low1_midSpline_Filter_1_x
test case: fast_low1_midSpline_Filter_1_x
test case: mid1_high2_midSpline_Filter_1_x
test case: fast_high2_midSpline_Filter_1_x
If you set the cursor in the select text box, the text of the double clicked filled is inserted always on the cursor position. Be aware that it is correct that what you want, see next.
7.1.2. Selecting approach
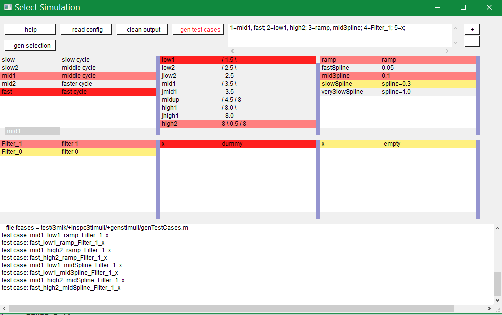 The same result can be done by selecting the relevant lines in the tables. Selecting is done by selecting the line in the table (with mouse or arrow up/down keys), then hold the shift key and press the arrow-down key. Then the line is marked red. It looks like right side:
Pressing the [ + ] button right sight constructs the stimuli selection text. The [ — ] button deselects the lines.
The double click approach may be faster, the selecting approach needs more handling but shows the selection as a whole before click the [ + ].
7.1.3. Selections of groups
Both with double click and selection approach you can build groups.
The intension for this example is: The jump stimulation does not need a selection of ramp or spline. It means a combination of jump and ramp with spline can be gotten in the following way:
Firstly double click some jump lines, and then ramp. You must select one of a line of the 3. table:
2=jlow2, jmid1, jhigh1; 3=ramp
The write a + manually in the selecting test box, for adding another combination. the cursor is behind the + . Then select a combination of ramps:
2=jlow2, jmid1, jhigh1; 3=ramp
+ 2=low2, midup, high2; 3=ramp, midSpline, verySlowSpline
That are in sum 3 + 3*3 = 12 test cases. Now you can combine this selections from 2 tables with a combination from the other tables. The key operator is & means 'and with':
2=jlow2, jmid1, jhigh1; 3=ramp
+ 2=low2, midup, high2; 3=ramp, midSpline, verySlowSpline
& 1=fast, mid1; 4=Filter_1
The second combination are 2 cases, so you get 24 test cases, well selected with ramp and spline or jump.
test case: fast_jlow2_ramp_Filter_1_
test case: fast_jmid1_ramp_Filter_1_
test case: fast_jhigh1_ramp_Filter_1_
test case: fast_low2_ramp_Filter_1_
test case: fast_midup_ramp_Filter_1_
test case: fast_high2_ramp_Filter_1_
test case: fast_low2_midSpline_Filter_1_
test case: fast_midup_midSpline_Filter_1_
test case: fast_high2_midSpline_Filter_1_
test case: fast_low2_verySlowSpline_Filter_1_
test case: fast_midup_verySlowSpline_Filter_1_
test case: fast_high2_verySlowSpline_Filter_1_
test case: mid1_jlow2_ramp_Filter_1_
test case: mid1_jmid1_ramp_Filter_1_
test case: mid1_jhigh1_ramp_Filter_1_
test case: mid1_low2_ramp_Filter_1_
test case: mid1_midup_ramp_Filter_1_
test case: mid1_high2_ramp_Filter_1_
test case: mid1_low2_midSpline_Filter_1_
test case: mid1_midup_midSpline_Filter_1_
test case: mid1_high2_midSpline_Filter_1_
test case: mid1_low2_verySlowSpline_Filter_1_
test case: mid1_midup_verySlowSpline_Filter_1_
test case: mid1_high2_verySlowSpline_Filter_1_
The selecting is an expression. But it is a simple expression which does not know paranthesis or such. The + binds stronger. The & is related to all + terms.
With an : as third operator you can add another independent selection. The & expression combines different tables. The : is only a separater for independent selection expressions which can use especially in the nightly tests as selecting expression.
You can write the select expression also only manually. The double click and selecting with [ + ] is only a writing help. It is more simple than type or copy the names with clip board. But you can tune the expression afterwards, adding something, deleting something etc.
Look on the video:
The content in this line has the same syntax as the automatically running test cases, see next chapter. The select pattern has the following syntax (ZBNF):
select::= { <selAnd> ? : }.    ##multiple independent select pattern, ':' is a OR
selAnd::= { <selAdd> ? & }.    ##select pattern for the combination of table selection.
selAdd::=  { <selLines> ? + }. ##select pattern part for some combinations
selLines::= { <#table> = {<$?selItem> ? , } [;] }. ##select pattern for items in lines
selItem: ... Should be match to the content in the 'select' raw of the tables.
table:   ... it is the number of the table starting from 1</pre>
-
Any
tableshould be denominated.<#?…>means it is a number. -
The
selItemis the name identifier in a line. It is here read till the terminating characters space, newline, or,;+:. But it is recommended that is an identifier (letters, digits and '_'). -
The denomination of more as one
selItemof the same table separated with the,is an 'OR' for the selection. -
selLinesshould denominated lines from some tables. -
The separation with
+is a second independent selection.selAddadds some selections. But allselLinesparts should use the same tables. -
An
&is an additional condition for all+conditions ('and with'). The+binds prior, the&is for all+terms. -
A separation with
:is a independent other condition for selection. -
ZBNF-Syntax:
{ … }is a repetition.{ … ? …}is a repition with separator denominated after the?.[ … ]is optional.
7.1.4. Intension, approach to find proper test cases
The example is simple. If you have more combinations, for example 12 tables which approximately 20 lines in each table (12 parameters with each 20 values), the combination are 20^12. It is not possible to test all combinations.
You may have a reduced test object, which runs a test fast. Or you visit only the stimuli itself. Then you can combine and assess. You can find proper test cases which are significant.
Then you can copy the selection from the text box immeditately to the test stimuli creation file as argument of `call genTestcases(select=<:>…<.>, `, for more such routines, it is the plan for the nightly tests.
7.2. How does it works? - Generation the test cases
The execution routine for the button [gen test cases] is contained in src/main/Smlk/libSmlk/+stimuli/createStimuli.jzTc. For the Simulink simulation approach a matlab.m file is created to organize Simulink calling. For other usages the common idea is: Any text file is generated which controls the tests.
##
##It produces the Matlab script to run a selection;
##The file name given as argument, default for button in GUI.
##This operation is called also in a ...createProgrammedTestCases and in the SimSelector GUI
##
sub genTestcases(String select, String name="genTestCases") {
  <+out><&scriptdir>/<&scriptfile>: genTestcases(<&select>, <&name>) .....<.+n>
  ##create all stimuli lines:
  ##Subtext test1 = <:>YTestA_<&varImpedance.name>_<&varShType.name><.>;
  String ffcases = <:><&dirMdl>/+genstimuli/<&name>.m<.>;
  <+out>currdir=<&currdir>
  file fcases = <&ffcases>
  <.+n>
  Openfile fcases = ffcases;
  ##Openfile fcsv = <:><&dirMdl>/+genstimuli/<&name>.csv<.>;
  <+fcases>
  <:>
==
==%%Fills the array of test cases
==clear testcases;
==ix = 1;
==<.><.+>
  if(fcsv) { <+fcsv>"Name", "Description", "todo",<.+n>; }
In this first part the genTestCases.m file is opened. A csv file is commented here, it may be used for evaluating and presenting tests. The text part is the start of the Matlab script.
Obj testcases = java org.vishia.testutil.TestConditionCombi.prepareTestCases(select, 5);
This is the essential line to build the combinations with the given select string in the above shown syntax. The combination is done with the calles Java routine (part of vishiaBase.jar, sources are open). See ../../../Java/docuSrcJava_vishiaBase/org/vishia/testutil/TestConditionCombi.html
Num ixcase = 1;
for(testcase: testcases) {
For each test case of this combination any text can be generated. Each test case contains a array of instances ../../../Java/docuSrcJava_vishiaBase/org/vishia/testutil/TestConditionCombi.NumString.html. The sel member is only the name in the table line, no more.
String name = <:><:for:var:testcase><&var.sel><:hasNext>_<.hasNext><.for><.>;
<+out>test case: <&name><.+n>
For the simulink usage the name is used (<&var.sel>) to build a Matlab array:
    <+fcases><: >
    <:>
 ===testcases{ix, 1} = '<:for:var:testcase> -u:<&var.sel><.for>'; ix = ix +1; <.><.+>
    if(fcsv) {
      <+fcsv>"TestA_<&name>", "<&var1.descr>_<&var2.descr>_<&var3.descr>_<&var4.descr>_<&var5.descr>"<.+n>
    }
    ixcase = ixcase + 1;
  }
}
For this usage the values in the line are not accessed yet. Another usage (test_emC) accesses immediately the information in the lines:
Obj testcases = java org.vishia.testutil.TestConditionCombi.prepareTestCases(select, 6);
for(testcase: testcases) { //The order in the testcase is always the order in the tabs.
  Obj lineObj =     tabObj.get(    testcase[0].sel);
  Obj lineRefl =    tabRefl.get(   testcase[1].sel);
  Obj lineStr =     tabStr.get(    testcase[2].sel);
  Obj lineThCxt =   tabThCxt.get(  testcase[3].sel);
  Obj lineExc =     tabExc.get(    testcase[4].sel);
  Obj lineTestSrc = tabTestSrc.get(testcase[5].sel);
This is done for simulink later, see below.
The simulink matlab.m script is produced furthermore with the invocation of the simulation in a loop (the for is in generated text, hence for Matlab).
  <+fcases>
  <:>
==
==for ix = 1 : size(testcases)
==  disp('====================== Prepare Simuli file =========================');
==  args = testcases{ix};  %curly braces
==    %The next script generates the stimuli file.m with the given args using this script too
==    cmd = strcat('test\Smlk\+inspcStimuli\+stimuli\createStimuli.jzT.cmd', args);
==    disp(cmd);
==    system(cmd);                            %generates genStimuli.m
==    disp('====================== START Simulation ==========================');
==    sim('+inspcStimuli/TestInspcStimuliMdl.mdl');
==
==end
  <.><.+>
  fcases.close();
  ##fcsv.close();
}
This are the Matlab statements to invoke the tests with the sim(…) call.
Before the simulation is started, a cmd is executed which generates the stimuli file with the information from the built Matlab array above stored in arg . The cmd invokes the shown JZtxtcmd script, which’s main() routine do the same as the [gen stimuli] button in the GUI, but with input of the cmd call. How does it works, is explained in the next chapter.
The result file src/test/Smlk/+inspcStimuli/+genstimuli/genTestCases.m looks like:
 %%Fills the array of test cases
 clear testcases;
 ix = 1;
.
 testcases{ix, 1} = ' -u:slow2 -u:mid1 -u:ramp -u:Filter_1 -u:x'; ix = ix +1;
 testcases{ix, 1} = ' -u:slow2 -u:mid1 -u:fastSpline -u:Filter_1 -u:x'; ix = ix +1;
 testcases{ix, 1} = ' -u:slow2 -u:midup -u:ramp -u:Filter_1 -u:x'; ix = ix +1;
 testcases{ix, 1} = ' -u:slow2 -u:midup -u:fastSpline -u:Filter_1 -u:x'; ix = ix +1;
.
for ix = 1 : size(testcases)
 disp('====================== Prepare Simuli file =========================');
 args = testcases{ix};  %curly braces
   %The next script generates the stimuli file.m with the given args using this script too
   cmd = strcat('test\Smlk\+inspcStimuli\+stimuli\createStimuli.jzT.cmd', args);
   disp(cmd);
   system(cmd);                            %generates genStimuli.m
   disp('====================== START Simulation ==========================');
   sim('+inspcStimuli/TestInspcStimuliMdl.mdl');
end
8. Execute nightly tests with the stimuli
The click of the tongue 'nightly' means, the tests need some more time, some hours, and should be thence well planned.
8.1. What should I do?
A possible file to generate a series of tests is in src/test/Smlk/+inspcStimuli/+stimuli/CreatePrgrTestCases.jzt.cmd:
 REM call of this file generates one stimuli file with the given settings.
 REM The start file is not this, it is stimSelection.jz.cmd, Note: Invocation is from ../Simulink as currdir
 if exist CreatePrgrTestCases.jzt.cmd cd ..\..\..\..
 java -cp ../libs/vishiaBase.jar org.vishia.jztxtcmd.JZtxtcmd %0
 pause
 exit /B
.
 ==JZtxtcmd==
 ##This subtext will be called with one line proper to testcase
.
 currdir = <:><&scriptdir>/../../../..<.>;
 include createStimuli.jzT.cmd;
 include Stimuli_SelectionTool.jzT.cmd;
 include Stimuli_template.m.jzTc;
.
 main(){
  <+out>Generate some programmed test cases:<.+n>
  call genTestcases(select="1=mid1; 2=mid1,high2; 3=midSpline,verySlowSpline; 4=Filter_1;", name = "testXy");
  call genTestcases( select=" 2=low2,midup; 3=ramp,fastSpline,slowSpline;
                     + 2=jlow2,jhigh2; 3=ramp;
                   & 1=mid1,fast; 4=Filter_1;", name = "test2");
  call genTestcases(select=" 2=low2,midup; 3=ramp,fastSpline,slowSpline;
                     + 2=jlow2,jhigh2; 3=ramp;
                   & 1=mid1,fast; & 4=Filter_1,Filter2;", name = "test3");
 }
This script can be started from its own directory, but it changes to the Simulink root directory for a unique situation of all scripts.
The java line uses this script as argument (the %0 as full absolute path). Its main() will be invoked.
The main calls the same genTestcases(…) as the Button from the GUI, but with manual given, pre-prepared combinations. The name argument is the file name for the name.m script, here testXy.m etc. The generated file looks like shown in the chapter above.
The model can be another one, using a variable in the genTestcases(…) script above. The consideration is, that for the nightly test an more comprehensive model can be used, the night is long enough. But for fast checks an more simpler model is used which runs fastly, but do not show all detailed results.
8.2. How does it works? The stimuli generation routine
For the simulink usage the stimuli file is generated with JZtxtcmd with the given names as key in the Matlab array only on execution of the stimuli. Another approach may be: Generation of all stimuli files in advance (in the preparation phase). But then this files should have a different name and should be managed.
The generation of the testcase.m file is exactly the same as from the button in the GUI, see chapter above. Hence the select String for the test cases can be copied via Clipboard to the file.
As shown in main chapter above, inside the generated test routine (test matlab.m file) a call
cmd = strcat('test\Smlk\+inspcStimuli\+stimuli\createStimuli.jzT.cmd', args);
disp(cmd);
system(cmd);                            %generates genStimuli.m
is called. This produces the stimuli Matlab file with given arguments, the names from the lines, using the List definition in …/+stimuli/Stimuli__SelectionTool.jzT.cmd. The args contains the keys for the conditions of the stimuli. The main routine of this script is:
##
##This main routine is used to generate the stimuli file.m from the template.
##
main ( ) {
 <+out>stimuli_scripts/createStimuli.jzT.cmd: main(<&$1>, <&$2>, <&$3>, <&$4>, <&$5> )<.+n>
 call genStimuli(key1 = &$1, key2 = &$2, key3 = &$3, key4 = &$4, key5 = &$5 );
}
It uses the args as $1 etc. and the calls:
##
##This routine is used for some given keys for lines.
##It searches the line and call the same as the btnGenSelection in the SimSelector GUI
##It is used especially to execute a name-given stimuli generation.
##
sub genStimuli(String key1, String key2, String key3, String key4, String key5, String key6){
  ##T: should be used as the temporary output for debugging, it may be a RAM disk, only temporary
##if(not File:"T:\".exists() ) {  cmd cmd.exe /C subst T: d:\tmp; }
<+out><&scriptdir>/createStimuli.jzT.cmd: genStimuli(key1="<&key1>", key2="<&key2>", key3="<&key3>", key4="<&key4>", key5="<&key5>") .....<.+n>
  Num found = 0;
  Obj var1 = variation_1.get(key1);
  Obj var2 = variation_2.get(key2);
  Obj var3 = variation_3.get(key3);
  Obj var4 = variation_4.get(key4);
  Obj var5 = variation_5.get(key5);
  <+out><&var1> <&var2> <&var3> <&var4> <.+n>
  if(var1 !=null && var2 !=null && var3 !=null && var4 !=null) {  ##Note: key5 may not used.
    found = 1;
    call btnGenSelection(line1=var1, line2=var2, line3=var3, line4=var4, line5=var5, line6="");
  }
  if(not found){ <+out>No stimuli case found. <.+n> }
}
This routine reads the lines from the tables (variation_…) defined in the included …/+stimuli/Stimuli__SelectionTool.jzT.cmd. Then it calls the same routine as on pressing [gen selection] in the GUI. The output is the stimuli.m file for the model for this simulation run.
In the loop of simulation runs all stimuli.m files are generated with this procedure.
9. Stimuli for Inspector
It may be recommended to set also internal variable of some DataStruct_Inspc FBlocks which are the core data FBlocks for ObjectOriented C/++ programmed FBlocks in Simulink.
It is TODO yet.
For a given simulation of a model in Simulink different Stimuli are necessary. It is nice if this stimuli can be selected by a graphical tool. The "vishia-SimSelector" is such an tool. It was written some years ago and currently improved.
../../mp4/SimSelector_Details_800kBps.mp4 (1280x768, 62 min)
../../mp4/SimSelector_Details.mp4 same with (1920x1080, 62 min)
TODO: ../../mp4/SimSelector_Details_short.mp4 same with (1280x768, 30 min)
This video shows usage, approach and the generation of textual test files not only for this TimeSignals simulink function block but for its common approach. The same "SimSelector" is currently in use for selection of test cases for the ../../../emc/html/emC_approach_en.html emC library or source set.